PPPoE Server Configuration Guide
Introduction
This guide provides a step-by-step tutorial for configuring the PPPoE Server capability on the Asterfusion Open Intelligent Gateway running AsterNOS-VPP.
By following this guide, you will transform a standard Layer 3 gateway into a high-performance Broadband Network Gateway (vBNG) capable of handling client dial-ups, centralized AAA billing, and internet access via NAT.
What This Guide Will Accomplish
This document is structured to reflect real-world enterprise deployment priorities:
- Scenario 1: Enterprise RADIUS Integration (Main Deployment) We will configure the gateway to act as a vBNG access node, integrated with an external RADIUS server for centralized Authentication, Authorization, and Accounting (AAA). This phase covers both local IP allocation and fully centralized RADIUS IP pool management.
- Scenario 2: Standalone Gateway Mode (Local Auth & NAT) Configuring the gateway to rely on its internal local database for dial-in access and enabling Source NAT (SNAT). This is ideal for small, isolated networks or as an emergency fallback.
Scenario 1: Enterprise RADIUS Integration
Network Topology Plan
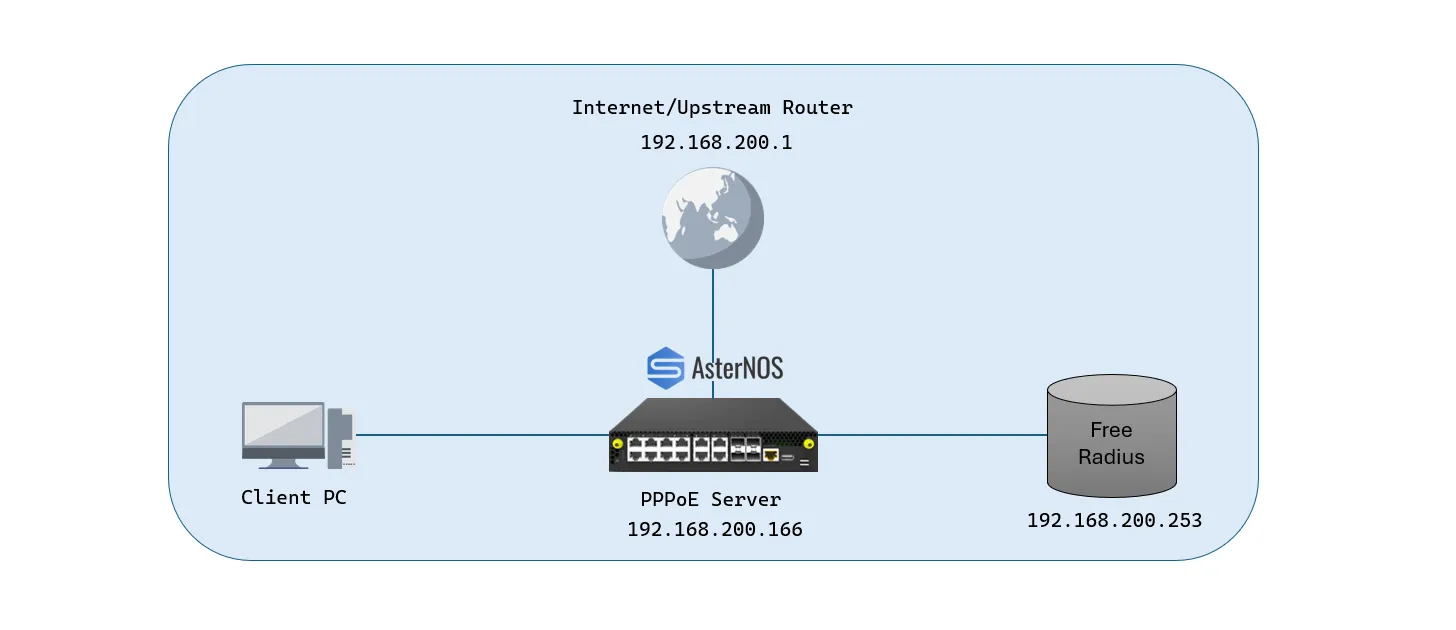
Target Configuration Plan
Device / Interface | IP Address / Subnet | Role |
|---|---|---|
AsterNOS (Eth1) | 192.168.200.166/24 | WAN Uplink (Route to RADIUS & Core Network) |
AsterNOS (Eth2) | N/A (Layer 2 PPPoE) | LAN Interface (PPPoE Dial-in Port) |
RADIUS Server | 192.168.200.253/24 | Centralized AAA Server (FreeRADIUS) |
Dial-in Client PC | 192.168.100.x/24 | PPPoE Client |
Phase 1: Baseline Setup (Local Pool IP Allocation)
In this phase, we establish an enterprise-grade vBNG architecture. To ensure a smooth deployment, we will build this in two stages:
- Baseline Setup: Centralized RADIUS authentication combined with AsterNOS local IP allocation.
- Advanced Setup: Fully centralized architecture where RADIUS handles both authentication and dynamic IP allocation.
Base Network & RADIUS Global Configuration
Configure the PPPoE Server
In our baseline setup, AsterNOS relies on RADIUS for user authentication but handles IP address distribution locally.
Note:
- If using accept-any-service enable: The service-name does not need to be configured on either the server or the client.
- If using accept-blank-service enable: The service-name must be configured on the server, and the client must not configure it (leave it blank).
FreeRADIUS Server Setup
Deploy a lightweight FreeRADIUS configuration focused strictly on AAA, without the complexity of IP pool management.
- Install FreeRADIUS
sudo apt-get update
sudo apt-get install freeradius -y- Configure the NAS Client (AsterNOS Gateway)
sudo nano /etc/freeradius/3.0/clients.confclient AsterNOS-Gateway {
ipaddr = 192.168.200.166
secret = aster123
}- Create the User Profile
sudo nano /etc/freeradius/3.0/users"radiususer" Cleartext-Password := "radius123"
Service-Type = Framed-User,
Framed-Protocol = PPP- Restart Service
Note:
On Ubuntu/Debian systems, FreeRADIUS starts automatically upon installation. A restart is required to load the newly configured clients and users.
sudo systemctl restart freeradiusPhase2: Advanced Integration (Centralized RADIUS IP Allocation)
Once the baseline authentication is verified, enterprise architectures typically migrate IP allocation to the RADIUS server. This consolidates user management and billing into a single pane of glass.
To upgrade from the Baseline to the Centralized architecture, follow these Delta steps:
Unbind the Local Pool on AsterNOS
Shift the allocation responsibility away from the gateway.
Configure the RADIUS IP Pool
sudo nano /etc/freeradius/3.0/mods-available/ippoolippool main_pool {
range_start = 192.168.100.10
range_stop = 192.168.100.254
netmask = 255.255.255.0
# Keep the following default parameters unchanged
filename = ${db_dir}/db.ippool
ip_index = ${db_dir}/db.ipindex
override = no
maximum_timeout = 0
}Enable the module
sudo ln -s /etc/freeradius/3.0/mods-available/ippool /etc/freeradius/3.0/mods-enabled/Activate IP Pool in Accounting & Post-Auth
sudo nano /etc/freeradius/3.0/sites-enabled/defaultIn the accounting { ... } block, add:
accounting {
        detail
        unix
        main_pool  # <--- Add this line
        exec
        # ...
}
In the post-auth { ... } block, add:
post-auth {
        exec
        main_pool  # <--- Add this line
        # ...
}
Update User Profile & Apply Changes
sudo nano /etc/freeradius/3.0/users
"radiususer" Cleartext-Password := "radius123", Pool-Name := "main_pool"
        Service-Type = Framed-User,
        Framed-Protocol = PPP
sudo systemctl restart freeradiusPhase 1 & 2 Verification
After completing the configuration and restarting the RADIUS service, follow these steps to verify that the PPPoE session is successfully established:
- Client Dial-in: Create a PPPoE connection on the client PC and dial in using your username and password.
- Check Session Status: Once successfully connected, execute the following command to view real-time session information.
Expected Output:
 Id  Iface      SessionId  RemoteMac          RemoteIp       LocalIp        LocalIf    PppoeServer     Uptime
---- ---------  -----------  -----------------  -------------  -------------  ---------  --------------  --------
   0 Ethernet3          384  00:e0:4c:68:06:0d  192.168.100.10 192.168.100.1  ppp0       pppoe-server-1  0:00:37
Tips:
Under the Scenario 1 configuration, the client can successfully dial in and establish a network connection. To enable internet access, please ensure that the core network has the appropriate NAT policies configured, or refer to Scenario 2 to enable local SNAT on AsterNOS.
Scenario 2: Standalone Gateway Mode & Fallback (Local Auth & NAT)
This section provides the complete, standalone configuration required to set up the PPPoE server using AsterNOS's internal database for authentication and local IP pool for address allocation.
Important:
AsterNOS does not support automatic fallback to the local database if a RADIUS server is configured but unreachable. You must manually remove the RADIUS server binding before local credentials can take effect.
Configure the PPPoE Server
Enable SNAT for Internet Access
To allow the locally authenticated PPPoE clients (e.g., 192.168.100.x) to browse the public internet, you must translate their private IPs to the WAN interface's public/uplink IP.
Verification
After completing the configuration, follow these steps to verify that the PPPoE session is successfully established:
- Client Dial-in: Create a PPPoE connection on the client PC and dial in using your username and password.
- Check Session Status: Once successfully connected, execute the following command to view real-time session information.
Expected Output:
 Id  Iface      SessionId  RemoteMac          RemoteIp       LocalIp        LocalIf    PppoeServer     Uptime
---- ---------  -----------  -----------------  -------------  -------------  ---------  --------------  --------
   0 Ethernet3          384  00:e0:4c:68:06:0d  192.168.100.10 192.168.100.1  ppp0       pppoe-server-1  0:00:37
Conclusion
This guide has verified the comprehensive PPPoE Server capabilities of AsterNOS, transforming a standard gateway into a high-performance vBNG. The completed scenarios demonstrate its deployment flexibility, seamlessly supporting both enterprise centralized RADIUS integration and standalone operations with local authentication and NAT.