GeoSite&GeoIP-VPP Case
Introduction
This guide provides a step-by-step tutorial for configuring Application-Aware Routing and Security Compliance policies using the GeoSite/GeoIP capabilities of the Asterfusion ET2500 Open Intelligent Gateway running AsterNOS-VPP.
What This Guide Will Accomplish
By following this guide, you will upgrade a basic routed network into an intelligent, application-aware gateway. Unlike traditional Layer 3 routing based solely on IP addresses, this guide demonstrates how to route and filter traffic based on Domain Names (GeoSite) and Geographic Location (GeoIP).
The scenarios covered are:
- Smart Traffic Steering (App-Aware Routing): Configuring the gateway to intelligently identify "Office/SaaS" traffic (e.g., Google) and route it through a dedicated Premium Line, while keeping general traffic on the standard ISP Line.
- Security Compliance (GeoIP & Filtering): Implementing security policies to block employee access to "Gaming/Gambling" categories and restricting internal server access to domestic IP addresses only.
Phase 1: Preparation and Environmental Overview
Network Topology Plan
We will utilize the following interfaces to simulate a dual-uplink enterprise environment based on your current lab setup. We use a secondary laptop to simulate the "Premium" gateway for verification purposes.
- Ethernet 1 (WAN 1 - ISP): The standard internet connection (connected to upstream switch).
- Ethernet 2 (WAN 2 - Premium): A simulated low-latency line. We will connect a Laptop here to act as the traffic destination/analyzer.
- Ethernet 3 (LAN): The internal user network.
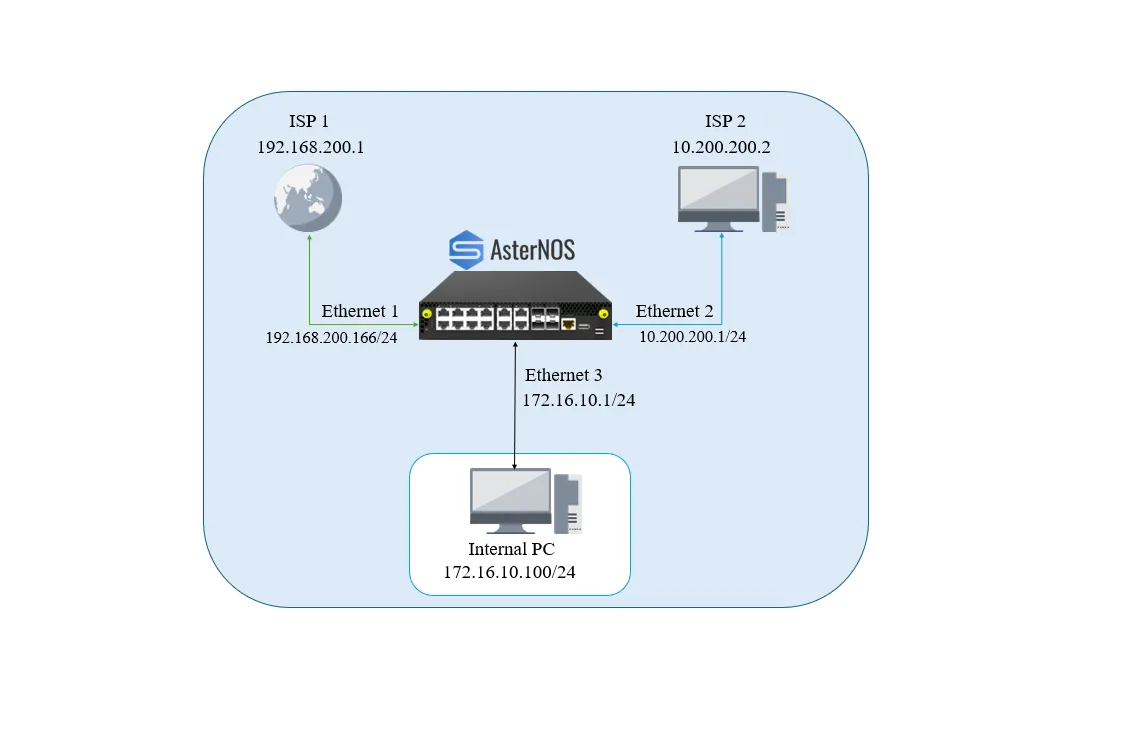
Target Configuration Plan
The following table outlines the IP addressing scheme we will implement:
Device / Interface | IP Address / Subnet | Gateway | Role |
|---|---|---|---|
AsterNOS (Eth1) | 192.168.200.166/24 | 192.168.200.1 | WAN - ISP Line (Default Internet Access) |
AsterNOS (Eth2) | 10.200.200.1/24 | 10.200.200.2* | WAN - Premium Line (Simulated Path for Baidu traffic) |
AsterNOS (Eth3) | 172.16.10.1/24 | N/A | LAN Gateway (Internal User Gateway) |
Laptop (Eth2) | 10.200.200.2/24 | N/A | Traffic Analyzer (Simulates Premium GW) |
Internal PC | 172.16.10.100/24 | 172.16.10.1 | Internal User |
Note: For the Laptop connected to Ethernet 2, you must manually set its static IP to 10.200.200.2. It will capture the traffic steered by the PBR policy.
Required Tools
- Wireshark: Installed on the Laptop (Eth2) to verify traffic steering.
- Ping / Browser: On the Internal PC to generate traffic.
Phase 2: Building the Basic Network
In this phase, we establish the physical connectivity and basic NAT services. We will configure Ethernet 1 as the ISP link and Ethernet 2 as the Premium link. Both interfaces will have NAT enabled to ensure internal users can communicate correctly with external networks (or our simulated probe).
Configuration Steps
Step 1: Configure LAN Interface (Ethernet 3)
Configure the interface connecting to your internal test PC.
Step 2: Configure WAN Interfaces (ISP & Premium)
We configure both WAN interfaces with their respective subnets and enable NAT Zone 1 on both to support outbound address translation.
Step 3: Configure Routing and NAT Rules
We set the default route to the ISP and define NAT pools for both uplinks. This ensures that whichever path traffic takes (steered by PBR or Default), it gets a valid source IP.
Phase 3: Smart Traffic Steering (PBR)
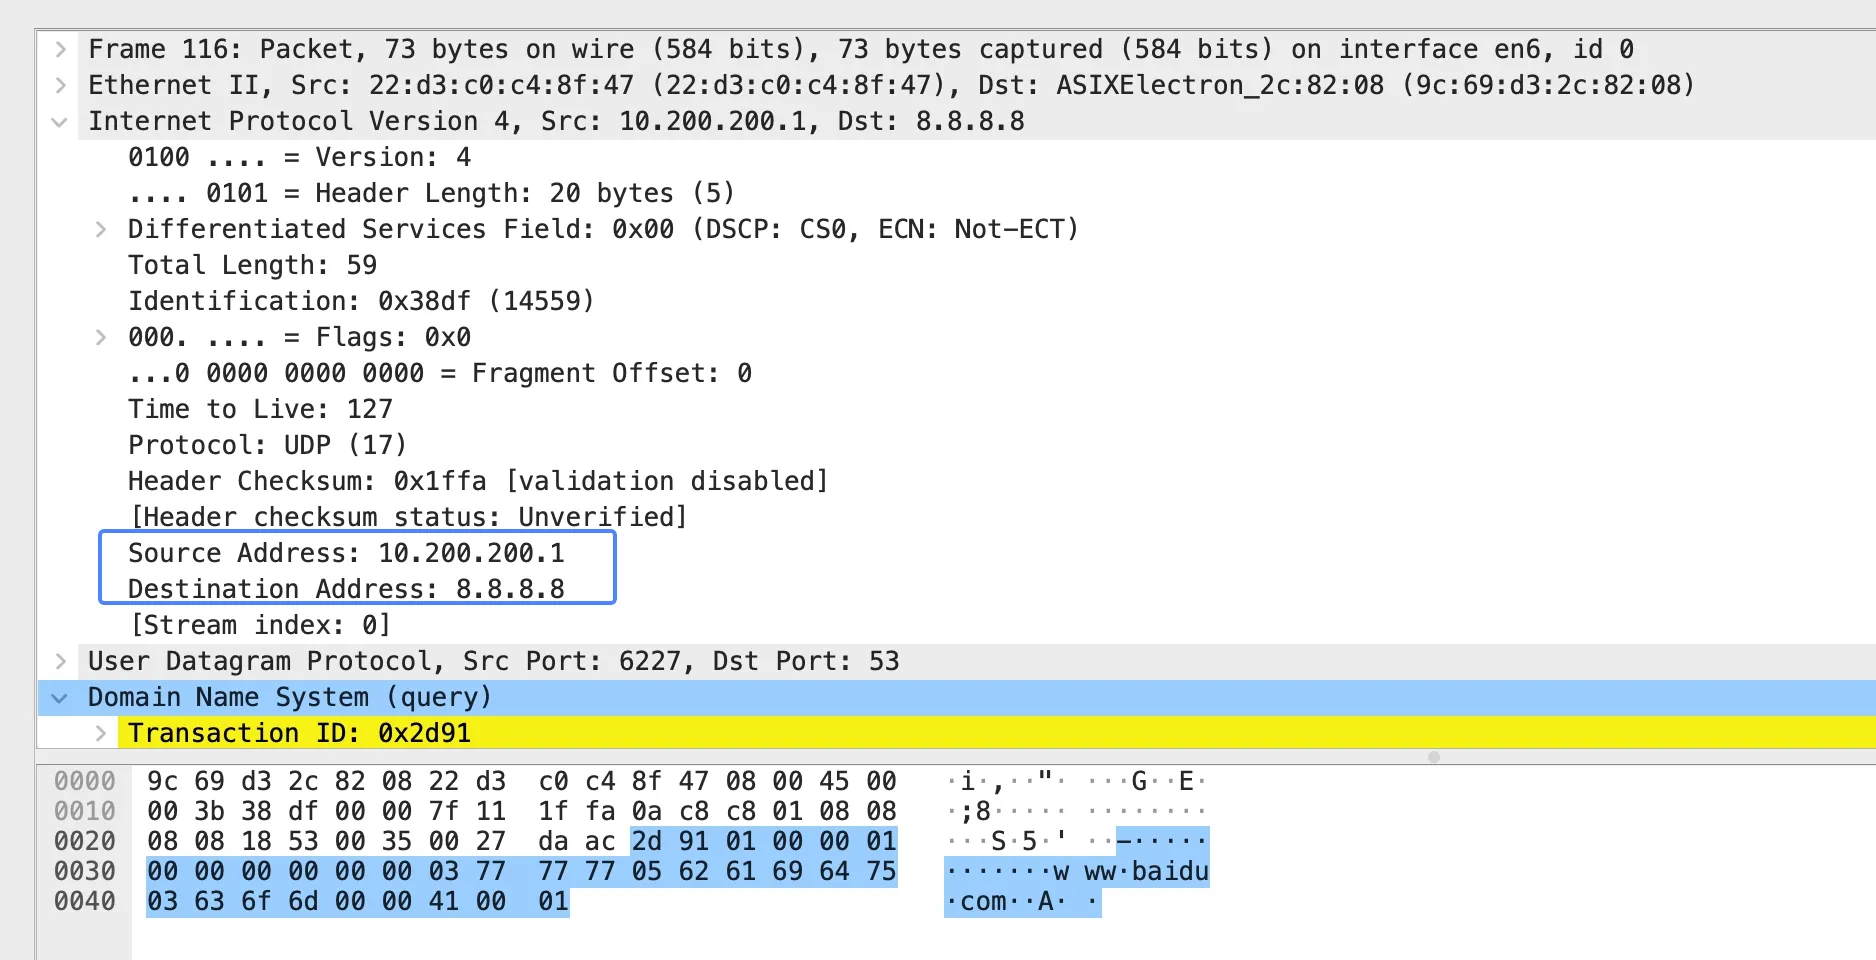
We will now configure Policy Based Routing (PBR) to intelligently hijack Baidu traffic and force it through the Premium Line (Ethernet 2).
Configuration Steps
Step 1: Configure PBR for Smart Steering
We define the policy map.
Note: We include match src-ip 0.0.0.0/0 to satisfy the flow key requirement, combined with geosite BAIDU for application identification.
Step 2: Apply Policy to LAN Interface
Bind the PBR policy to the interface where traffic enters the gateway (Ethernet 3).
Phase 4: Security Compliance (ACL + GeoIP)
In this phase, we will shift focus from routing to security. We will deploy an Access Control List (ACL) to block access to specific content categories and restrict traffic based on geographic location.
Prerequisites: Clean Up PBR Policy
Before applying the new security policies, we must remove the PBR policy configured in Phase 3 to ensure a clean testing environment and avoid policy conflicts.
Configuration Steps
Step 1: Create Security ACL
We define an ACL named SECURE_ACL applied in the inbound direction.
- Rule 10: Blocks all websites classified as "Media" (e.g., BBC, CNN).
- Rule20: Blocks all IP addresses located in China (CN).
- Default Behavior: Traffic not matching these rules will be permitted by default.
Step 2: Apply ACL to LAN Interface
We apply this security policy to the LAN interface. Crucially, we also update the NAT binding. We will replace the global NAT binding with an ACL-based NAT binding. This ensures that only traffic permitted by SECURE_ACL is translated and allowed to access the Internet.
Step 3: Save Configuration
Verification (Phase 4)
1. Verify Media Block
- Action: On the Internal PC, try to access an international media site (e.g., www.cnn.com).
- Result: The connection should fail/timeout.
- CLI Validation: Check the counters to see Rule 10 incrementing.
2. Verify GeoIP Permit
- Action: Access a China website (e.g., www.baidu.com).
- Result: The connection should fail/timeout (matches Rule 20 Deny).
3. Verify Normal Access
- Action: Try to access a non-media, non-CN site (e.g., a US-based technical site like www.gnu.org or stackoverflow.com).
- Result: Access successful. The traffic does not match Rule 10 or 20, so it is permitted and successfully NATed.
Conclusion
You have successfully transformed the AsterNOS gateway into an intelligent, application-aware edge device.
- Routing: Traffic is steered based on Application Identity (Google -> Premium Line) using PBR.
- Security: Traffic is filtered based on Content Category (Games) and Geography (CN) using ACLs.